


Thursday, August 23, 2012
FREE jewelry
Hurry on over to Daily Deal, 1 Sale a Day to receive a Free Silver Plated Heart Pendant or Silver Plated Hoop Earrings. Just login or sign up and it's free. Offer runs until 10PM MST. ENJOY!http://1saleaday.com/weloveyou/
Tuesday, August 21, 2012
Jewelry Candle Giveaway

Want to Win a BRAND NEW PUMPKIN SPICE Jewelry Candle? Check out this great giveaway.
You can enter here!
You can enter here!
Sunday, August 19, 2012
No Rub Remover
I just don't have the time or patience to sit and rub nail polish remover on my toes to scrub off the polish and let's be honest I'm just not that flexible anymore either. So I pretty much always just let them grow out. They go until they are chipped and half off on their own before someone tells me they look bad and I'm shamed into finally removing the polish.
 So this time around when faced with glittery polish, which is by far the worst stuff to get off, I decided to try the no rub foil method of removal.
Armed with my remover, ugly polished toes, cotton balls, foil, and some tissues (in case of accidents) I set to work.
To begin you'll gather up your supplies from the above list and should also included a beverage, tv remote, snacks, and comfy clothes. (Any none photographed items are optional.)
 You only need to use a small chunk of cotton ball for each toe so 2 cotton balls should be enough to do both feet. I only used one for both.
Pour a little polish remover onto the cotton ball piece and place directly onto nail. You don't want this dripping wet, just use a little. Then rip a piece of foil big enough to go around your toe. Wrap foil piece around the cotton ball and your toe and squeeze it in place.

 Once all ten piggies are covered sit back, relax and enjoy your snack. Or whatever else you actually need to be doing! How ever you choose to spend this time you'll want to let it sit on for about 5 minutes.
When you go to remove don't lift or unwrap the foil, instead pinch the foil down against your nail and pull the whole thing off together. The little bit of pressure will pull all the soaked polish right off. Just for the photo I lifted so you could see how easily the polish comes off.
 Check for any missed spots, some polish can be very stubborn. Then give your toes a rinse to remove any left over remover. This method will also work on finger nails. Plus you can chase your kids pretending to have crazy witch fingers.
Now to decide what you want to put next on your newly clean and pretty toes. I decided to stare at how pretty they are clean and decided I'm still far too lazy and unflexible to paint them!
 So this time around when faced with glittery polish, which is by far the worst stuff to get off, I decided to try the no rub foil method of removal.
 Armed with my remover, ugly polished toes, cotton balls, foil, and some tissues (in case of accidents) I set to work.
To begin you'll gather up your supplies from the above list and should also included a beverage, tv remote, snacks, and comfy clothes. (Any none photographed items are optional.)
 You only need to use a small chunk of cotton ball for each toe so 2 cotton balls should be enough to do both feet. I only used one for both.
Pour a little polish remover onto the cotton ball piece and place directly onto nail. You don't want this dripping wet, just use a little. Then rip a piece of foil big enough to go around your toe. Wrap foil piece around the cotton ball and your toe and squeeze it in place.

 Once all ten piggies are covered sit back, relax and enjoy your snack. Or whatever else you actually need to be doing! How ever you choose to spend this time you'll want to let it sit on for about 5 minutes.
When you go to remove don't lift or unwrap the foil, instead pinch the foil down against your nail and pull the whole thing off together. The little bit of pressure will pull all the soaked polish right off. Just for the photo I lifted so you could see how easily the polish comes off.
 Check for any missed spots, some polish can be very stubborn. Then give your toes a rinse to remove any left over remover. This method will also work on finger nails. Plus you can chase your kids pretending to have crazy witch fingers.
Now to decide what you want to put next on your newly clean and pretty toes. I decided to stare at how pretty they are clean and decided I'm still far too lazy and unflexible to paint them!
Friday, August 10, 2012
Binky Fix
Mini man C loves his pacifier or binky as we call it. I try to only let him have them at nap and bed but I decided when A was a baby and refused all binkies and bottles that they really weren't such a bad thing. So the rule for in bed only never seems to be something I'm strict about.
When C was tiny he couldn't keep a binky in his mouth to save my sanity. He had enough dexterity to pick up and put the binkies in his mouth but didn't always pick it up the right direction and would get very upset. So in the middle of the night the hubby and I would have to shuffle in and correct the backwards issue. This is when I decided he needed help and started looking for something.
 I happened upon WubbaNub and got two thinking he at least wouldn't loose them behind the crib anymore. It was instant love. C could grab these cute things and pop the binky right in his mouth. It was perfect. That is until the binky started to break off where it's sewn. They are almost 2 years old so really I'm amazed they didn't break sooner. I knew they would eventually. Then this week it finally fell apart. C looked worried when I said it was broken but sat quietly and watched me fix.
The up side is that fixing is both easy and can not only be done as a repair but also to turn just about any tiny stuffed toy into a binky friend. As a bonus I can now detach the binky for easy cleaning.

Here's what you'll need:
- Stuffed toy and binky of choice
- Snap and Snap setter (OR if you don't want to use snaps you can use a binky adapter or silicone O-ring)
- Ribbon, needle, thread, scissors
Start by opening a slit in the toys mouth to sew in the ribbon. You could also just sew ribbon over if you don't want to cut the toy open.

Use sturdy ribbon, I like grosgrain. Cut ribbon to length based on space needed to attach binky. I suggest doubling over the ribbon. Some will be sewn inside the toy so you should cut it longer than you need and adjust down when you sew in place.
If you want to use an o-ring or adapter instead of snaps, fold the ribbon in half and loop it through the o-ring or adapter before sewing. For snaps fold the ribbon ends into the middle and then in half. Tuck either option ribbon ends inside the toys mouth and hand sew in place. Use thread the color of the toy so it won't show.
 (If you sew to the surface and don't hide the ribbon ends inside the toy you'll want to tuck the ends so that they are hidden when sewn.)
Once ribbon is sewn your toy should look like it is sticking out its tongue at you. Two tongues for snaps or one tongue with a ring if you used the o-ring or adapter.
Now you'll place your snaps top and bottom. Leave yourself plenty of room to attach the binky. Mine was a little too close so it can be hard to attach to the binky without a little work.
 When everything is finished grab a binky and make sure it works. I use the snaps alone on both Soothie \ Gumdrop (as shown) and handle style binkies. Then I clip in an o-ring to attach to any MAM style or loop around any thicker handles. In the end it works great and C was very happy to have his binky back.
I forgot the best part! When they are old enough to part ways with a pacifier they can still keep the cute little friend to sleep with and be comforted. Then they only loose half the comfort object instead of going cold turkey. And how could I ever take anything away from that face?!
Monday, August 6, 2012
Diaper Bassinet
 Had so much fun today putting together a diaper bassinet gift basket. This will be going to a soon to be new mom (and dad) to triplets. Good luck!!
Here's what's inside:
50 size 1 diapers
12 baby washcloths
4 receiving blankets
4 spoons
3 handmade crochet bow ties
3 onsies
2 books
1 wipes container
1 basket

Bassinet Assembly:
First in the basket was the larger of two books, The Nursing Mother's Companion. On top of the book sits 50 diapers. They seem so small next to the size 4 my own little guy is in these days.
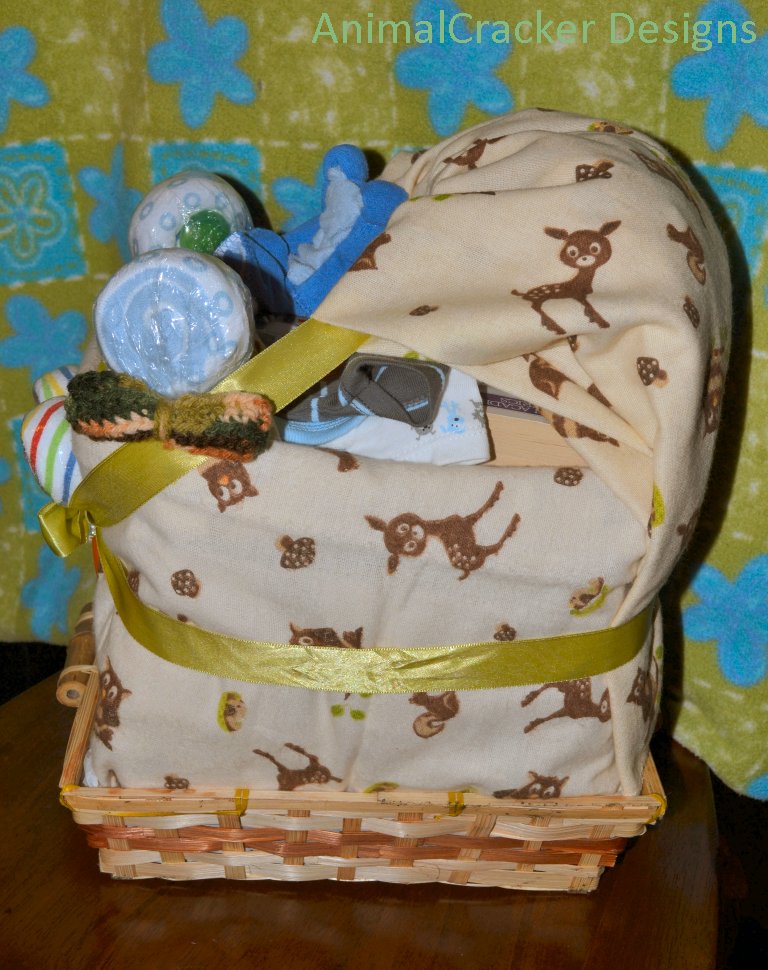 The diapers were covered with one blanket and the outside wrapped on 3 sides with another. A third blanket is run up the back to create the canopy which is stuffed with some paper to puff it up.
Inside the bed area sit a flat wipes container and on top of that under the canopy is the other book. You can just see the book pages in the picture (right). Next are three adorable onsies tucked in with the last blanket. Washcloths made into lollipops (with spoons for sticks) and a teddy bear are tucked in next to the onsies and stuck in front. The four left over are tucked under the canopy to add a little more height.
And last but not least three handmade crochet bow ties are stuck to the lollies and a onsie.


If you've never made a washcloth lollipops before it is really easy. Grab a baby wash cloth and fold it diagonally in half. If you want two tone fold another cloth and set it on top of first with the long edge a little higher up. Roll it up into a log starting with the small corner. Pick either end to start and roll your log into a circle. If you used two colors make sure that you roll so they both show. Once it's rolled up you'll want to cover it so it doesn't come unrolled. I like heat shrink plastic but you can also use little plastic baggies or even plastic wrap or cellophane.
 Once the roll is wrapped slide an infant spoon on to the back of the roll to act as the stick. Then just tie it off with ribbon or a twist tie and there you have it, lollipop washcloths.
The most fun of the entire thing was when C, who is almost 2, came over begging for one of the lollipops. Apparently they look good enough to eat. I showed him how I made it with a wash rag and spoon and he looked at the one I rolled up like I was totally crazy. I even got a real swirl lolli out of the candy bowl and he still wanted the ones off the front of the basket!
Saturday, August 4, 2012
Doll Hair Renewal
When 'B' came to me the other day pointing out that the wings on her doll would no longer work I sat down assuming this was another cheap toy that I would have to sadly confirm was unfixable. What I discovered instead was that tons of the dolls hair was wound around the terribly placed winding point on the doll. So what was once a cute fairy doll had become a tangled mess of hair that stuck the gears.


 And so it was time for the messy headed dolls to take a little head first dip in a pool of detangling solution (And under go some hair removal). The solution is 2-4 cups HOT water (not boiling, but as hot as you can still place your hand in to) and about a Tablespoon of whatever liquid fabric softener you happen to have in your laundry room.


 Soak dolls hair for about 30 seconds in solution. Then comb dolls hair out against a hard surface, like the sink edge. If it's still hard to comb give hair another dip or two. Once the hair is all combed out, give it a rinse, let air dry, and then style as you like.
My plan was to keep the tangled broken winder from happening again so we went with some fun braided up-dos.


 And so it was time for the messy headed dolls to take a little head first dip in a pool of detangling solution (And under go some hair removal). The solution is 2-4 cups HOT water (not boiling, but as hot as you can still place your hand in to) and about a Tablespoon of whatever liquid fabric softener you happen to have in your laundry room.


My plan was to keep the tangled broken winder from happening again so we went with some fun braided up-dos.


Subscribe to:
Posts
(
Atom
)